|
Picture Viewer |
  
|
|
Picture Viewer |
|
Picture Viewer is a feature for viewing, printing and editing images.
To open its window click on the open ![]() Picture Viewer button located at Main toolbar > Tools tab > Viewers group
Picture Viewer button located at Main toolbar > Tools tab > Viewers group
It can open and save images in all popular formats; BMP, EMF, GIF, ICO, JPG, PNG, TIFF, EXIF, WMF.
Our picture viewer provide also a few simple image processing methods like for example changing image colors, resizing and capture screen or window.
How to view images:
There a three methods
| 1. | Double click on selected image file in File Browser |
| 2. | Select a picture file from Open file dialog window |
| 3. | Use the Next or Previous buttons to move between images on disk |
| 4. | Start the images slideshow by pressing the Start Slideshow button located under Tools menu |
To control the view the following commands are available to use with Picture Viewer and they are located on the viewer's toolbar:
![]()
![]() View Mode
View Mode
Here is the drop down options selector where you can select how the image is resized to fit into picture viewer's window bounds.
Original
The picture will be shown with original size
Fit
Picture will be resized to fit entire picture viewer's window. The picture will be resized proportionally with aspect ratio preserved.
Clip
If a picture original size is bigger the picture viewer window then picture will be resized to fit into a picture viewer window otherwise it will be shown in its original size.
Fixed
Picture will be resized to the size as the last time you have resized an image using zoom commands
![]() Zoom In
Zoom In ![]() Zoom Out
Zoom Out
Click on this button to zoom in or zoom out the image within picture viewer's window
![]() Full Screen
Full Screen
Click on this button to open and view image in a Full Screen mode
![]() Previous
Previous ![]() Next
Next
Load and display either next or previous picture from the disk (if there is any present).
![]() Reload
Reload
Click on this button to reload last loaded image from disk, any changes made to the existing image will be lost.
![]() Tools
Tools
Tools menu has the following commands:
![]() Slideshow
Slideshow
Picture Viewer can show a sequence of images as a slideshow, each image being shown for some predetermined time before going on to the next.
You can perform a slide show whenever more than one supported image file is in the current folder, program will detect this automatically for you, if there are no more images nothing happens.
To stop slide show simply click on this button once again or press F6 key on your keyboard.
![]() Slideshow Interval
Slideshow Interval
Here you set the slideshow interval value to specify for how long the images will be shown.
This property is measured in milliseconds, so 2000 millisecond = 2 sec for example
![]() Load
Load
Invokes the File dialog prompting for a file name, and opens selected image
![]() Save
Save
Saves current image to disk, if image is not located on disk the you will be prompted for a file name and location
![]() Save As
Save As
Invokes the File dialog prompting for a file name, and saves image in a file with specified name and format
![]() Capture Screen
Capture Screen
Click on this button to start capture the desktop window. You will be prompted to hide unnecessary windows, after that you can capture the screen by clicking right mouse button.
![]() Capture Window
Capture Window
Click on this button to start capture the selected window. You will be prompted to select window you want to capture, after that you can capture the window by clicking right mouse button.
Please note that due to the way Windows repaints its desktop if selected window extends beyond desktop boundaries (i.e. it is cut off by screen edge) only the visible part will be captured.
![]() Capture Window Client Area
Capture Window Client Area
This command works in the same way as above Capture window but will capture window without its borders.
![]() Copy To Clipboard
Copy To Clipboard
Click on this button to copy image to your computer Clipboard
![]() Paste From Clipboard
Paste From Clipboard
Using this method you can load and display an image that has been previously copied to clipboard by any Windows program
![]() Print
Print
Click on this button to prints current image. Aspect ratio of the image is maintained automatically.
![]() Print Preview
Print Preview
Click on this button to open a print preview window
![]() Color
Color
Tools menu has the following commands:
![]() Brightness & Contrast
Brightness & Contrast
Click on this button to open a small tool window where you can use sliders to increase or decrease image brightness or contrast
Translate Colors
Click on this button to open a small tool window where you can use sliders to adjusts color channels of loaded image. Amount of change in each channel is controlled by the sliders position of 'red', 'green', and 'blue' slider
Gray Scale
Converts loaded image to grayscale (256 shades of gray).
![]() Rotate
Rotate
Rotate menu has few commands that lets you rotate or flip image
![]() Resize
Resize
Resize
Click on this button to a small tool window where you can resize image. When you open this tool window then current image width and height will be shown in the window
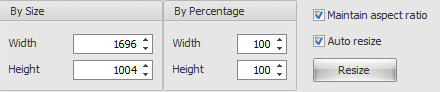
You can resize the image by specifying its new width or height size. To do so enter new values into width or height text box.
Also, you can resize image by entering a percent value into width or height text box within By Percent text boxes group.
Maintain aspect ratio
If this check mark is checked then while resizing aspect ratio of an image is maintained. The aspect ratio of an image is its width divided by its height. In that case when you change image width value then image height will be automatically recalculated to maintain aspect ratio. The same is done when you change the image height, new with will be recalculated automatically.
If unchecked then you can set any width or height of image.
Auto resize
If this check mark is checked then while entering any new width or height values an image will be resized in picture viewer's window automatically.
When check mark is unchecked the to resize an image to its new size you must click the Resize button
Resize To Window
Click on this button to resize current image to fit into picture viewer window
![]() Selection
Selection
Selection menu has a few command that lets you select a part of image and then copy or paste the selection
![]() Deselect
Deselect
Click on this button to deselect image if selection is present
![]() Cut
Cut
Click on this button to cut selection to your computer Clipboard
![]() Copy
Copy
Click on this button to copy selection to your computer Clipboard
![]() Paste
Paste
Click on this button to paste selection onto current image.
To paste previously copied selection again onto image please click with left mouse button on image and move a mouse a little to set the let and top position where you want to paste the selection.
This move is like the selecting on image but the purpose is to set the left and top positions only, the width and height of new selection is disregarded
If you do not set new the left and top position then the selection will be pasted on image to the left upper corner.
![]() Paste As New Image
Paste As New Image
Click on this button to paste selection as new image